ADVERTISEMENT
Puff Pastry Cream Horns: A Delightfully Easy, Party-Ready Treat
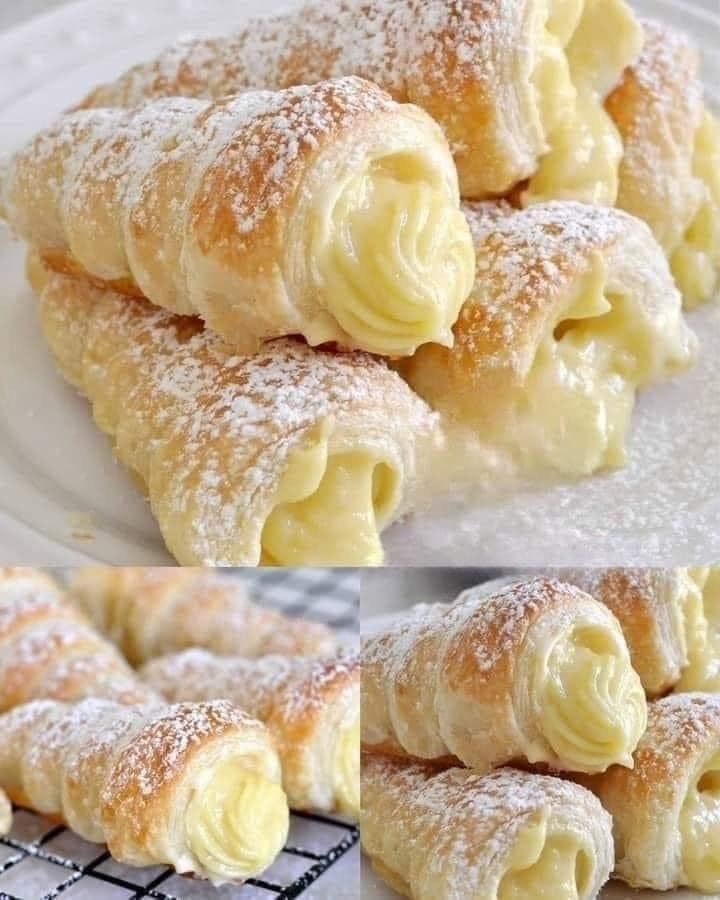
These puff pastry cream horns are a perfect no-bake dessert option that looks as stunning as it tastes. The combination of flaky pastry and sweet, creamy filling makes these horns a hit at gatherings, holiday parties, and family events. With their impressive look and delicious taste, these cream horns are easy to make, too—no baking experience needed! Let’s dive into the ingredients, step-by-step preparation, and some creative ways to make this recipe your own.
Ingredients and Equipment Needed
Ingredients
- 2 boxes puff pastry dough, thawed: Provides the buttery, flaky shell for the cream horns.
- 1 tablespoon water: Helps seal the pastry edges.
- 1/2 cup unsalted butter, softened: Adds richness to the filling.
- 1/2 cup vegetable shortening: Creates a smooth, stable cream that holds up well.
- 3 cups powdered sugar: Sweetens the filling and gives it a light, fluffy texture.
- 3 cups marshmallow fluff: Brings a pillowy sweetness to the cream filling.
- 1 teaspoon vanilla extract: Adds a hint of warmth and flavor.
- 2 tablespoons heavy cream (optional): For an extra creamy filling if desired.
Equipment Needed
- Cream horn molds or a cone-shaped substitute (like foil molds)
- Pastry brush for water application
- Large mixing bowl and hand mixer
- Piping bag for filling the horns
- Rolling pin and baking sheet
Step-by-Step Preparation Guide
Step 1: Prepare the Puff Pastry
- Preheat your oven to 400°F.
- Roll out the thawed puff pastry dough on a lightly floured surface to prevent sticking.
- Using a sharp knife or pizza cutter, slice the dough into 1-inch strips.
Step 2: Wrap the Pastry on the Molds
- Take a strip of dough and wrap it around a cream horn mold or foil cone, slightly overlapping each layer as you go.
- Lightly brush the edge of each strip with water to help it stick to itself.
- Place the wrapped molds seam-side down on a baking sheet.
Step 3: Bake the Pastry
- Bake the wrapped molds in the preheated oven for about 12-15 minutes or until golden brown.
- Remove from the oven and let them cool completely before gently removing the molds.
Step 4: Make the Cream Filling
- In a large mixing bowl, beat the softened butter and shortening until smooth and creamy.
- Gradually add the powdered sugar, beating until fluffy.
- Mix in the marshmallow fluff and vanilla extract until well combined. If desired, add the heavy cream for an extra smooth texture.
Step 5: Fill the Pastry Horns
- Transfer the cream filling into a piping bag fitted with a large tip.
- Pipe the filling into each pastry horn, filling it from the bottom to the top.
- Optional: Dust the finished cream horns with powdered sugar or drizzle with melted chocolate for extra flair.
Optional Variations and Creative Additions
- Chocolate-Coated Cream Horns: For a rich chocolate twist, dip the ends of each pastry horn in melted chocolate and let it set before filling.
- Berry Filling: Add a few tablespoons of berry jam or puree to the cream filling for a fruity variation that pairs perfectly with the flaky pastry.
- Citrus Zest: Stir in a teaspoon of lemon or orange zest to the cream filling for a refreshing citrus flavor.
- Whipped Cream Filling: Substitute half of the marshmallow fluff with whipped cream for a lighter, airier filling.
- Sprinkles and Toppings: Add colored sprinkles, chopped nuts, or shredded coconut to the filled cream horns for extra color and crunch.
Serving Tips
These cream horns are best enjoyed chilled, making them a refreshing treat. Serve them on a platter, ideally lined with doilies or small dessert plates for easy handling. Pairing them with coffee, tea, or a glass of champagne makes for an elegant dessert presentation. For parties, arrange them in a tiered display to create a beautiful dessert table centerpiece.
FAQs for Best Preparation and Storage Practices
1. Can I make the cream filling ahead of time? Yes! The cream filling can be made a day in advance. Store it in an airtight container in the refrigerator, then give it a quick stir before piping it into the horns.
2. How do I store leftover cream horns? Place leftover cream horns in an airtight container and refrigerate. They’re best enjoyed within 2-3 days, as the pastry may start to lose its crispness over time.
3. Can I freeze cream horns? While you can freeze the pastry shells alone, the cream filling doesn’t freeze well. To freeze, bake and cool the pastry horns, then store them in an airtight container. Fill with cream after thawing and just before serving.
4. What if I don’t have cream horn molds? No problem! You can easily make molds by shaping small cones out of aluminum foil. Wrap the dough around the foil cones just as you would with regular molds.
5. Can I use pre-made whipped cream as a filling? You can, but whipped cream may not hold up as long as the butter-based filling. If you’re planning to make these for immediate serving, pre-made whipped cream can be a quick and tasty alternative.
Conclusion: A Nostalgic, Elegant Treat to Share and Enjoy
These puff pastry cream horns are a timeless dessert that brings a sense of nostalgia with every bite. With a golden, flaky exterior and a luscious vanilla cream filling, they’re sure to impress guests at any gathering. This recipe is simple enough to make with basic ingredients, yet elegant enough to serve at special occasions. Perfectly party-friendly and endlessly customizable, these cream horns are a delicious, easy-to-make treat that everyone will love! Enjoy each bite of this delightful dessert that combines classic flavors with a touch of elegance.
